
Firefall

FIREFALL
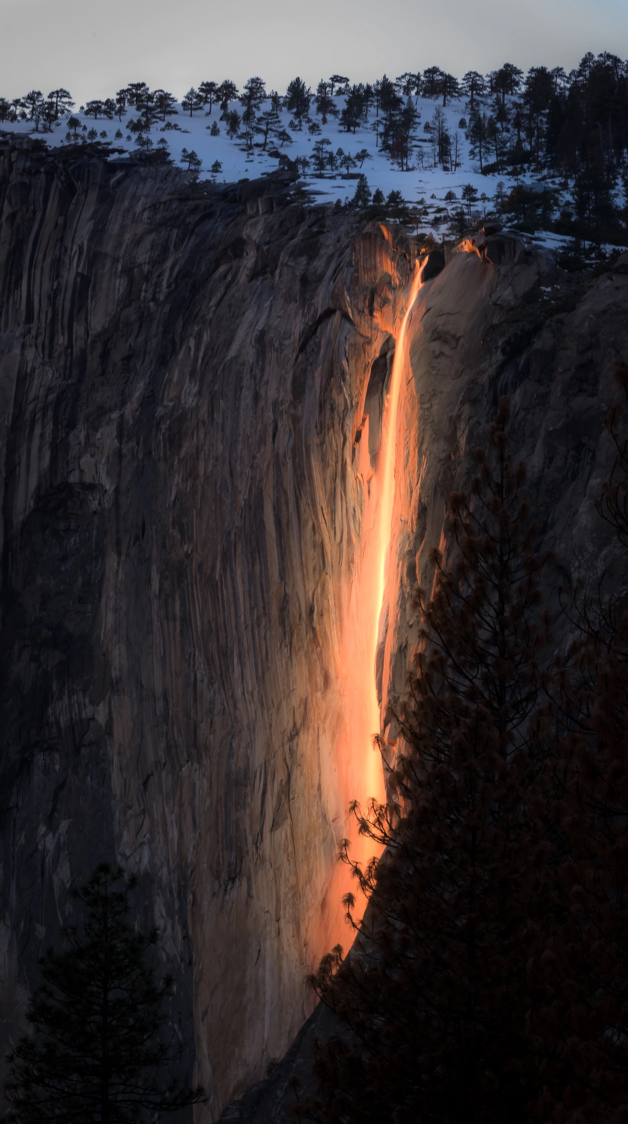
Horsetail Falls, Yosemite National Park, CA
Image by Don Metz @ www.donmetzphotography.com
For a short window of about two weeks each year from mid to late February the setting sun’s light illuminates the wispy Horsetail Falls on the east face of El Capitan. This phenomenon was first photographed by Galen Rowell in 1973 and has since evolved into an annual frenzy that now resembles a tailgate party. However, it is a remarkable natural phenomenon that is fascinating to see if you’re willing to brave the crowds and the potential disappointment that often occurs because there’s several factors that must be present for this display to manifest itself.
There must be significant snowpack accumulated atop of El Capitan to provide the snow needed to create the waterfall. Then during the two week period the setting sun is aligned with the falls, it must be warm enough for the snow to melt and the falls to run and there cannot be any clouds that block the sun’s rays (which is often the case in the afternoon during this time of year). Finally the atmosphere itself must be clear enough to prevent any haze from blocking the sun’s light.

Photos and location summary by Don Metz.
Trail Difficulty - EASY TO MODERATE
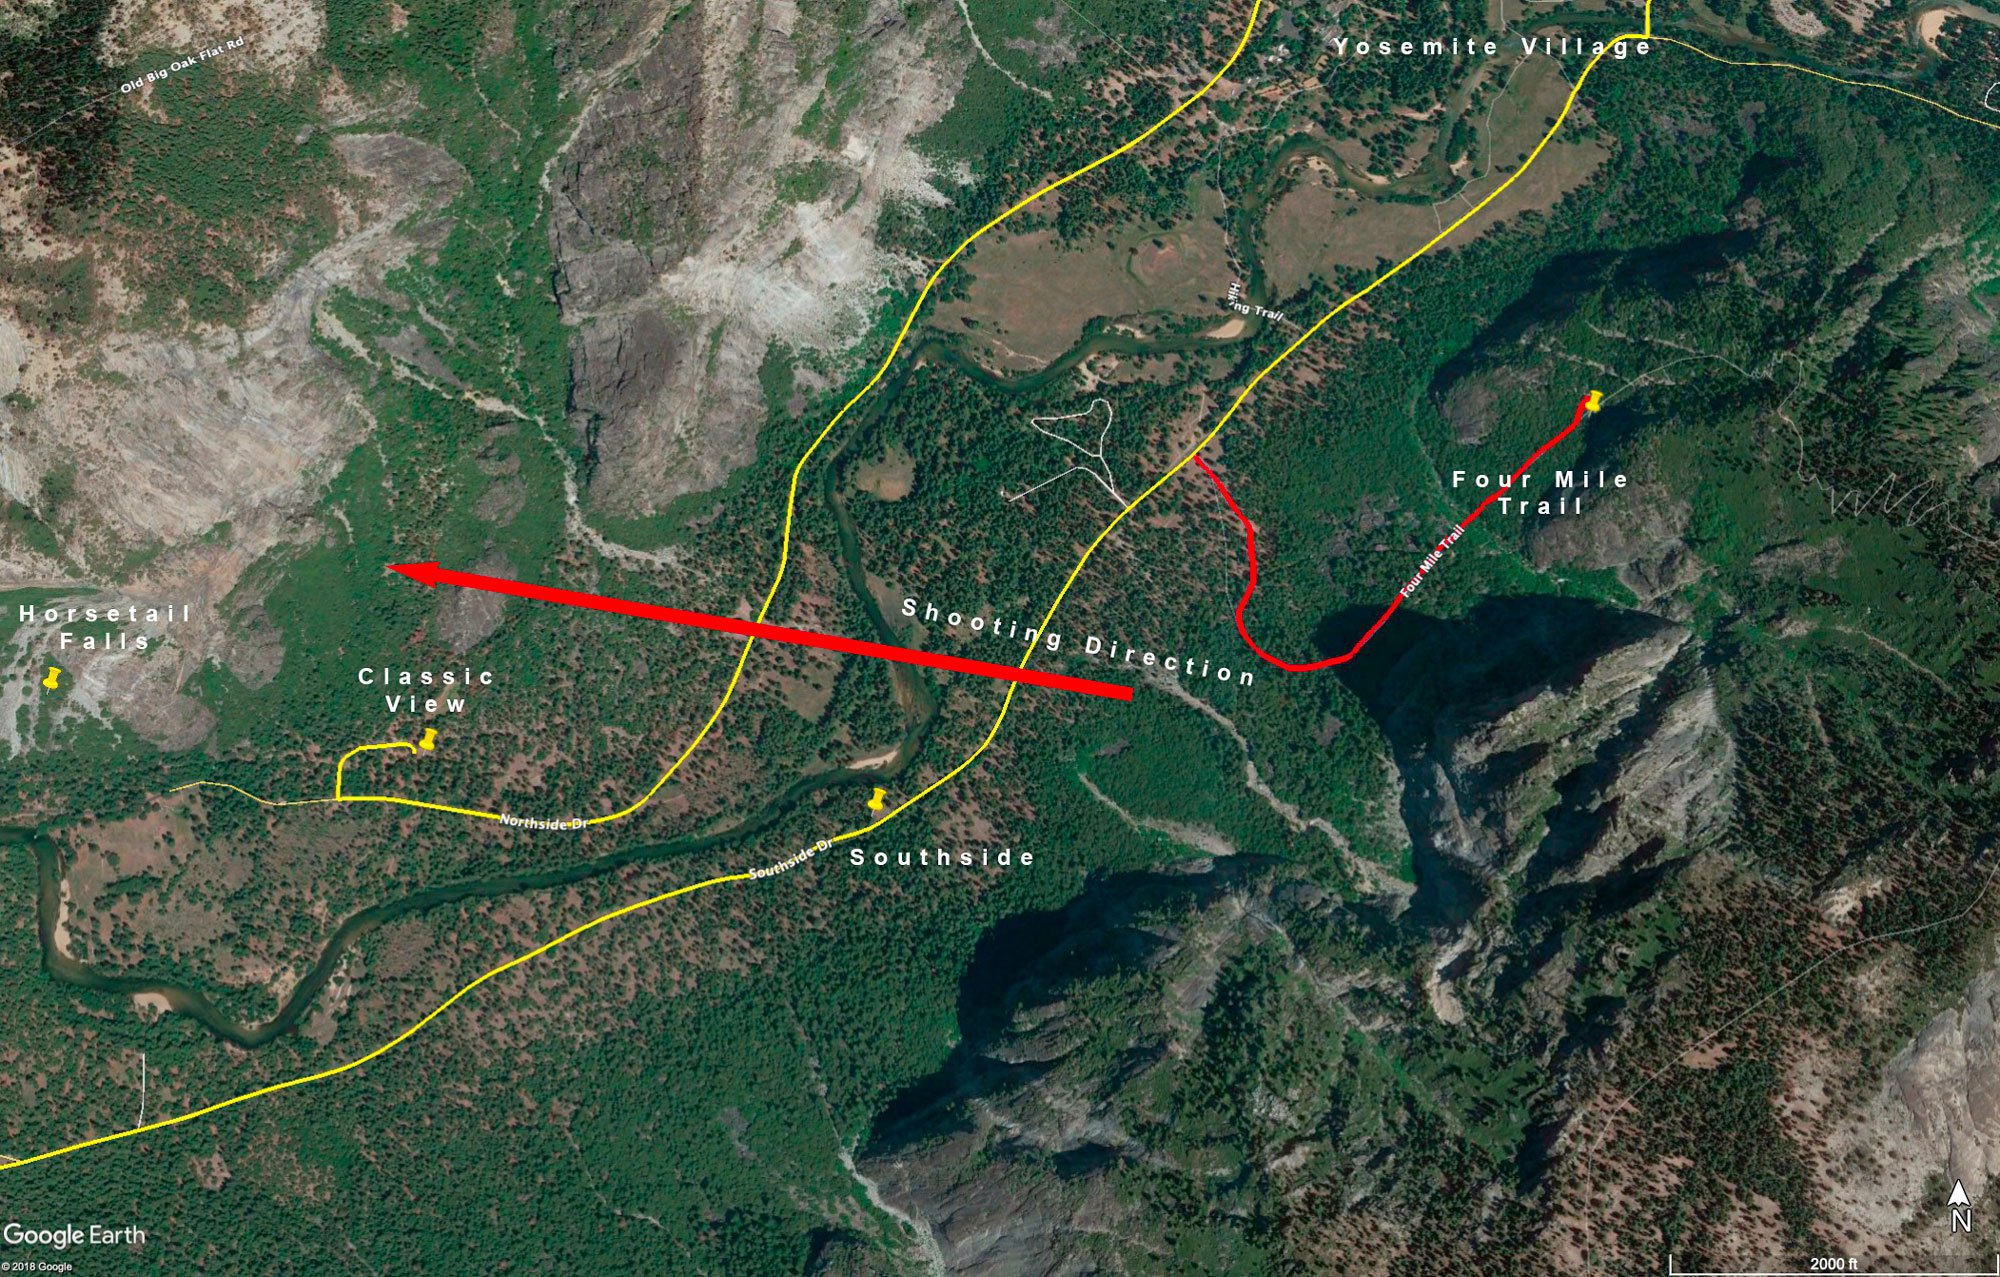
There are several locations to view and shoot the Firefall phenomenon. In this summary, we provide 3 different locations: 1) The classic location popularized by Galen Rowell, 2) an alternate location (southside) between the Cathedral Beach picnic area and the Swinging Bridge along the banks of the Merced River and 3) a viewpoint along the Four Mile trail. The first two locations are easy (right off the road) and the last location is about 3/4 of a mile up the Four Mile trail which may be snow covered and might require micro-spikes or sturdy hiking boots.
The challenge with these locations is that they are relatively small areas and the popularity of the event results in hundreds of people, cameras and tripods jammed together. Photographers often begin staking their claim to a tripod location shortly after sunrise, setup a camp chair and just spend the day enjoying the outdoors and communing with other photographers. The challenge is finding views of the falls that are clear of the numerous tall trees that often block the line of site. As such, there are only a handful of places that offer a clear viewpoint.
Compounding these challenges are the recent efforts by the NPS to control the crowds and mitigate some of the damage that has been occurring to the meadows. These efforts include closing the Northside Drive to cars, implementing a lottery system for parking, and severely restricting where people can go to view the falls. This is a work-in-progress for the NPS, so you’ll need to check the Yosemite website under the Plan Your Visit > Places to Go > Waterfalls section for the most current information.
Assuming the roads have not been closed to parking, there are minimal parking areas on both North and South side drives. Unless you arrive very early in the morning to stake your claim, be prepared to park in one of the lots near the visitor center or the lodge and either walk or take the shuttle bus.
GPS Coordinates & Elevation
Classic viewing area - 37°43'41.18"N 119°37'10.70"W
Southside viewing area - 37°43'37.39"N 119°36'33.31"W
Four mile trail viewpoint - 37°44'5.28"N 119°35'32.16"W (approx)
4,025 - 4,480 Ft. Elevation
View In Google earth
Directions
CLICK HERE to get driving directions to the classic shooting location for Firefall from Wawona, CA.
The Firefall viewing locations are located within Yosemite Valley, which is about 175 miles and 4 hours from Sacramento to the north via CA-99 through Manteca and then east on CA-120 until you enter Yosemite National Park. From Fresno to the south there’s a couple of routes that take about 2.5-3.0 hours, but is dependent on the weather and road conditions.
The fastest route is via CA-41 through Oakhurst and Wawona. Road conditions can change quickly during the winter once you enter the surrounding Sierra National Forest, so make sure you check in advance whether or not the road is open. The alternative route is slightly longer at 120 miles via CA-99 north to CA-140 in Merced and through Mariposa. This route is also subject to closure due to winter storm activity, so you’ll want to check road conditions in advance. If both of these routes are closed the only other route is to take CA-99 to Merced and continue north on J59 (LaGrange Road) to Chinese Camp and then turn east onto CA-120 into Yosemite National Park.
There are several viewing locations within the valley, which are explained in more detail in the Nuances of Shot section.
Photography Tips
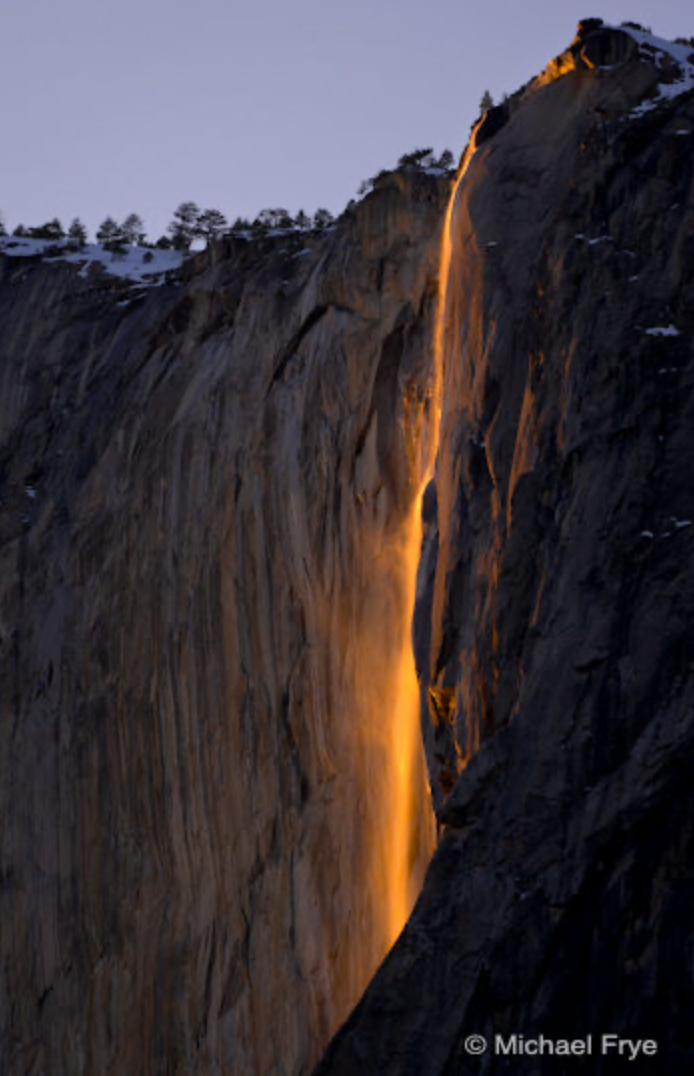
The Classic viewing location is the closest to the falls and offers the most diversity in terms of focal length. From this location you can capture more expansive images that include the surrounding face of El Capitan and the sky (especially if there are interesting clouds and color) to tight close-up photos of the falls or sections of the falls. Sometimes low clouds will develop below the rim that offer some interesting compositions and high winds can create some very interesting effects as the waterfall spray is dispersed and lights up in the air and across the face of El Capitan.
Generally, focal lengths from 100mm to 300mm are used at this location. Use of a polarizer is recommended to mitigate the glare that can occur from the sunlight shining on the water. A neutral density filter may also be useful as you experiment with different exposure lengths depending on how silky and diffuse you want the water to appear.
The Southside viewing location has a similar perspective as the Classic, but from a further distance. The view of the rim is expanded so that you can actually see the snow and the incline of the terrain atop of El Capitan, although you have more trees to workaround or try to incorporate as a frame depending on your focal length. Since you are located further away, longer focal lengths will be necessary to capture close-up images.
The Four Mile Trail viewing location is located on the west pointing switchbacks within the first 0.7 miles of the trail. This is an easy, well maintained trail but, it may be snow covered and you should be prepared with micro-spikes or sturdy hiking boots with an aggressive tread if there’s snow on the trail.
As you hike up the trail there are tantalizing glimpses of El Capitan and the falls through the trees, but few locations that offer an unobstructed view. Unless you bring a very long lens and sturdy tripod that can truly keep the camera vibration free for a long exposure, the compositional opportunity is primarily to capture the falls within the larger context of El Capitan. This perspective also enables you to capture more of the snowpack and pine trees on top of El Capitan. This can be a compelling composition if there’s a colorful sky or interesting clouds along with a strong display of color in the falls to help them standout amongst the larger frame of El Capitan.
For more information regarding Horsetail Falls during this special annual phenomenon, I would recommend following the blogs of Michael Frye and Gary Hart. Both are Yosemite photographic experts who provide good insights each year into the conditions that are needed for the falls and excellent tips on how to capture strong images of this amazing occurrence.
Other Images From This Location
Best Time of Day to Shoot
This phenomenon only happens late in the afternoon just before sunset - as the last rays of the sun strikes the horsetail falls. The above shot was taken at 5:34 pm, about 5 minutes before sunset.
The red Firefall glow lasts about 15 minutes, but the peak color is less than 10 minutes; so make sure you know what focal lengths and exposure times you want to capture in advance so you can quickly adjust and shoot to capture as many frames as possible. It is also helpful to lock-in infinity focus so you don't have any inadvertent focus changes while you are shooting. Auto-focus sensors sometimes get confused by flowing water, especially as the light fades. So, locking-in infinity should prevent any focus changes or lost time while you re-establish proper focus.
Best Time of Year
The Firefall phenomenon only happens about two weeks each year - from mid to late February.
The above shot was taken on February 18
Lens(es) Needed
Recommended lenses for the different locations:
Classic viewing location - 100 to 200mm depending on the composition and how much of the area surrounding the waterfall you want to include.
Southside viewing location - 150mm to 300mm depending on the composition. Since this may be a long exposure capture, make sure your tripod and ball head are locked down to prevent any vibrations from impacting the exposure.
Four mile trail viewing location - 200mm or greater. This composition does not lend itself to a tight focus on the falls, rather it is more about capturing the falls within the broader context of El Capitan. If you want to carry a super-telephoto lens up the trail you could certainly get a tight composition, but these types of lenses don't lend themselves to long exposures.
The shot shown above was taken at the Classic viewing location with a 70-200mm lens (image shot at 200mm).
Birds-Eye View
Permits
This location is in Yosemite National Park. As of the writing of the summary (Dec 2019) the entry fee was $35 per vehicle. Once in the park there are no other permits required.
Direction of the Shot
As mentioned, there are several locations to view and shoot the Firefall phenomenon. Depending on where you are, the direction of the shot will be west between 260° to 280°.
Equipment Needed
Photographing Horsetails Falls during the Firefall phenomenon period is unique to most other landscape photography opportunities. From a photography equipment standpoint, you will need the right lens (100-300mm recommended) a sturdy tripod, a polarizing filter and an optional ND filter.
Additional other equipment needed is a camp chair, food and refreshments and the appropriate clothing for the weather.
Number of Other Photographers to Expect
On most days around the Firefall timeframe, the area will be packed with photographers and tripods - with long lenses all looking to capture one of the most amazing photographic opportunities in North America. For the most part, photographers are a friendly and respectful bunch - so most of the fellow adventures will help pass the time and provide great stories of places they have been and places yet to be explored.
If you want a great shot, be prepared to arrive in the early morning and enjoy a day at Yosemite.
Weather
The weather is Yosemite varies by where you are. For the most part you will be in valley floor (approx. 4,000 ft). Make sure you check the local weather and Yosemite road conditions and be prepared for the worst.
Cell Service
I use Verizon, and the cell service in the park is available, but spotty.
Lodging & Camping
There are many lodging and camping opportunities in Yosemite - ranging from a simple tent only campground to The Majestic Yosemite Hotel. I would simply direct you to the National Parks Service for Yosemite website to explore the options. I would however, encourage you to visit The Majestic Yosemite Hotel (formally the Ahwahnee). The hotel was built back in the 1930’s and has a wonderful old majestic feel about it.
Nearby camping and lodging
Camping - click on the campground below for directions
Upper Pines (in Yosemite Valley)
Lower Pines (in Yosemite Valley)
Camp 4 (in Yosemite Valley)
Lodging - click on the lodging below for a TripAdvisor review
Nearby Restaurants
There are numerous restaurants and places to eat in the Yosemite valley. Most of the eating establishments are just national park food - with a few exceptions. My favorites are the dining room at the Majestic Hotel and the half dome village (Curry Village) pizza patio. Breakfast at the Majestic Hotel is special (consider the blueberry pancakes).
Nearby Restaurants - click on the restaurant below for yelp review
The Majestic Yosemite Dining Room
(209) 372-1489
Area Guides and Workshops
None